Setting up an IDE : Eclipse |
Editor(s): KeiichiroOno PietMolenaar |
Date: July 5, 2012 |
Status: Updated for Eclipse Juno |
Contents
Introduction
This is an introduction to Cytoscape 3 App development for Eclipse users.
Prerequisites
You need to know basics of Eclipse and Maven.
Install JDK
To develop Cytoscape 3, you need Java 6 or 7. If you find problems on Java 7, please let us know.
Setting up Eclipse
This procedure had been tested with latest version of Eclipse, Juno (4.2). You can use any version of Eclipse distribution, but we recommend to use Eclipse for RCP and RAP Developers or Eclipse IDE for Java Developers.
Use JDK, not JRE
Make sure eclipse is running in the JDK virtual machine; on Windows this is not default. To use JDK's VM, create a shortcut and edit the shortcut's property: eclipse.exe -vm "c:\your_path_to_JDK\bin\javaw.exe"
Installing Eclipse Plugins From Eclipse Marketplace
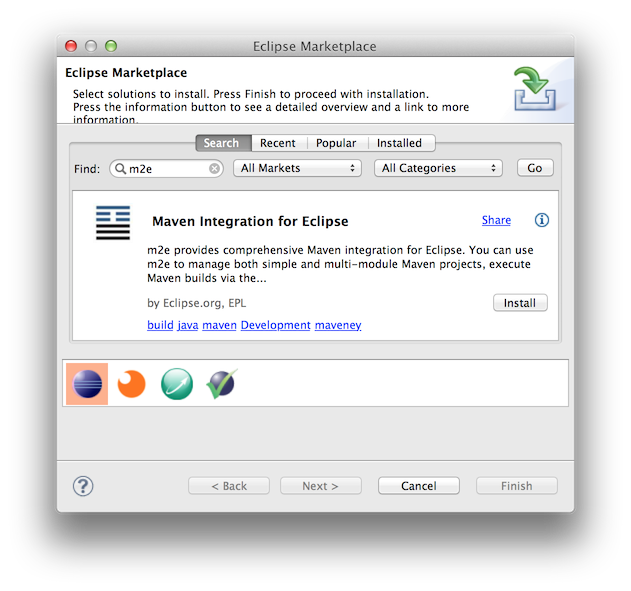
Eclipse Indigo and later include a feature called the Eclipse Marketplace. All of the following plugins are available from the Marketplace. To install an Eclipse plugin, open the Marketplace dialog (Help → Eclipse Marketplace), type the plugin name in the search box, and click Install.

Usually, you will be asked to restart Eclipse after installing plugins.
Eclipse Plugins to Install
You need to install some Eclipse plugins to develop Cytoscape 3 apps. All of the following are required to develop Cytoscape 3 (or any Java applications using Maven and Spring).
EGit
EGit provides Eclipse with Git integration. It is included with most Eclipse distributions, but in case yours doesn't, you'll need to install it to get the source code from our GitHub repositories.
m2eclipse
M2Eclipse is an Eclipse plugin to integrate Maven. Now it is a part of Eclipse foundation, and it is a part of Eclipse distribution. You do not have to install this plugin in Juno.
Many useful documents are available from the project and we recommend to read them.
Checkout Cytoscape 3 App Developer's Template Project
In the menu, select File → Import → Git → Projects from Git → URI.
Under URI, paste https://github.com/cytoscape/cytoscape-app-developer.git. Eclipse will fill in the other fields for you automatically:
Under Initial branch select:
master if you want to develop an app using the latest stable release of Cytoscape, or
develop if you want to develop an app using the latest Cytoscape sources in the repository.
Click Next.
Select Import as general project.
Click Next.
Click Finish.
Now you should have a project in Eclipse called cytoscape-app-developer.
Right click on the project and select Configure → Convert to Maven Project.
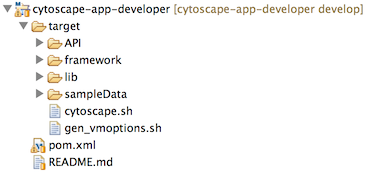
- You should end up with a project that looks like this:
Build App Developer's Template Project
Right-click cytoscape project top folder
Select Run As → Maven Build
Type clean install in the Goals text box
Click Run button
Now you can see the following directory structure under target directory (if you cannot see target, press f5 to refresh your workspace):

Run Cytoscape 3
- Open command-line terminal.
Go into target directory you've just created with m2eclipse plugin
Execute cytoscape.sh (for unix/mac) or cytoscape.bat (windows)
If you can run Cytoscape, now you are ready to code your app.
Create the App
There are two types of apps for Cytoscape 3 and you can use Eclipse for both of them.
Simple App
Select New → Java Project
Enter project name. This can be anything. In this example, we use Cy3SimpleApp as a sample app name.
Add cytoscape-app-api jar file as a library
Right-click src folder and create a class file HelloWorldApp. Use org.cytoscape.sample as its package name
Create Manifest file. It's just a text file named MANIFEST.MF. The only entry you need to write in this file is the following:
Manifest-Version: 1.0
Cytoscape-App: org.cytoscape.sample.HelloWorldApp
This is your App's main class name. Be sure to include a return at the end of the last line or it may be excluded upon export!
- Your project directory looks like this:
- Write App main class:
   1 package org.cytoscape.sample;
   2
   3 import org.cytoscape.app.AbstractCyApp;
   4 import org.cytoscape.app.CyAppAdapter;
   5
   6 public class HelloWorldApp extends AbstractCyApp {
   7
   8         public HelloWorldApp(CyAppAdapter adapter) {
   9                 super(adapter);
  10
  11                 System.out.println("Hello Cytoscape 3!");
  12         }
  13 }
  14
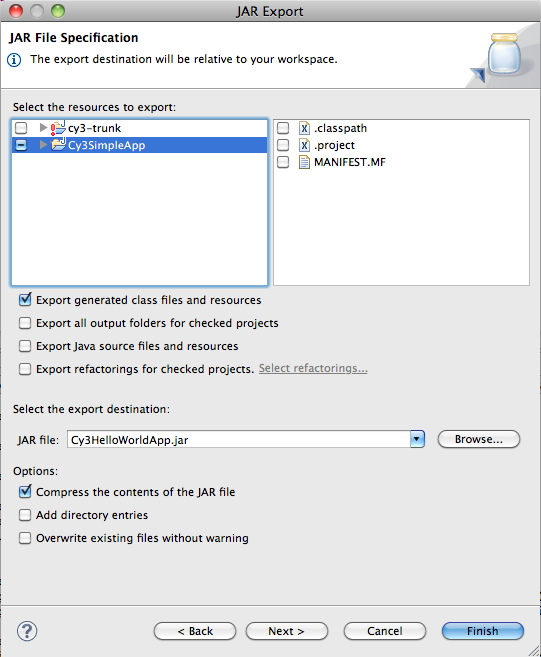
Select File>Export
Select JAR FIle and click Next
Uncheck MANIFEST.MF file. Otherwise, two manifest files will be created in the JAR!
Type app jar file name and click Next
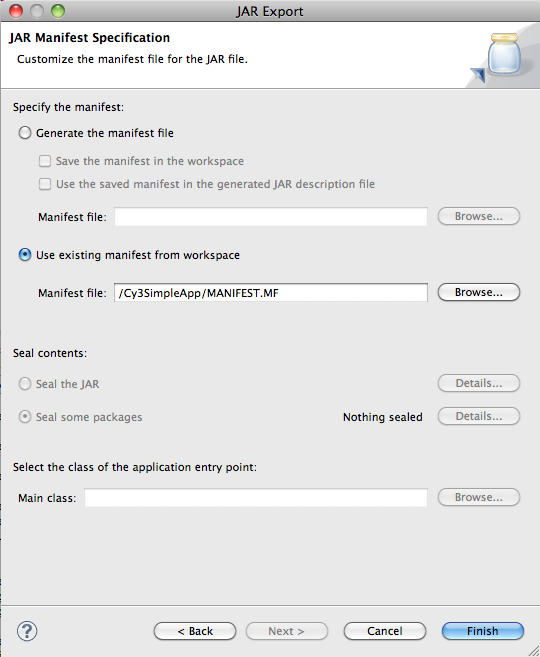
Leave all settings as-is and click Next
Select Use existing manifest from workspace and specify the one you've just created
Click Finish. Make sure the app jar file exists in the directory you specified above.
Test your app
- Run Cytoscape from command-line
Select Apps>App Manager
Select Import Local App tab
Click Select button and select the app jar file you've created
You can see Hello Cytoscape 3! in the console
For more realistic example, please try this tutorial:
Tutorial:Creating a Simple Cytoscape 3 App
Cytoscape 3 Bundle App
If you want to create Cytoscape 3 Native bundle app, please try the following tutorial:
Tutorial:Creating an OSGi Bundle Cytoscape 3 App
Questions?
If you find problems or have questions, please let us know.


