|
Size: 20589
Comment:
|
Size: 22973
Comment:
|
| Deletions are marked like this. | Additions are marked like this. |
| Line 3: | Line 3: |
|
* Document revesion 1.0 release: KeiichiroOno * Document revesion 1.1 release. Fixed minor issues based on feedback: KeiichiroOno * Document revesion 1.2 release. OSGi Project Nature section added: KeiichiroOno * Document revesion 1.2.1 release. VM Argument added for look & feel problem: KeiichiroOno * Document revesion 1.3.0 release. Tutorial is based on [[http://www.cytoscape.org/cgi-bin/moin.cgi/Cytoscape_3.0/Eclipse/CytoscapeIDE|CytoscapeIDE]]: KeiichiroOno * (!) Document revesion 1.3.1. Cytoscape IDE plugin is a bit out-of-date, so please install plugins one by one if you have any problems.: KeiichiroOno * Document revesion 1.4: Updated for Cytoscape IDE 0.1.0: KeiichiroOno (5/7/2009) |
* Current version is not compatible with Eclipse 3.5 (Galileo). I'll release updated version soon: KeiichiroOno (10/2/2009) * (!) Document revesion 1.5: Updated for Cytoscape IDE 0.1.1. All steps are confirmed to work on Windows XP SP3 + JDK 1.6.0u13: KeiichiroOno (5/8/2009) * Document revesion 1.5.1: Minor update: KeiichiroOno (5/18/2009) |
| Line 45: | Line 41: |
|
==== For Windows Users: Set JDK JVM ==== Usually, Eclipse for Windows use JRE virtual machine instead of JDK's VM. To use JDK's VM, create a shortcut and edit the shortcut's property: {{{ eclipse.exe -vm "c:¥path to jdk¥bin¥javaw.exe" }}} |
|
| Line 76: | Line 78: |
| * Eclipse PDE 3.4.2 Ganymede (64 bit version) | * Eclipse PDE 3.4.2 Ganymede |
| Line 82: | Line 84: |
|
* Test Platform 2 (Windows) __Still have some issues__ * Windows XP SP3 |
* Test Platform 2 (Windows) __Still have small issues__ * Windows XP SP3 32 Bit |
| Line 86: | Line 88: |
|
* Test Platform 3 (Mac) '''''Confirmed to work''''' * Mac OS X Tiger (10.4.11) * Apple's Java SE 5 (1.5.0_13) |
* Test Platform 3 (Mac) |
| Line 98: | Line 98: |
| 1. If you are a core developer, use '''''svn+ssh://grenache.ucsd.edu/common/svn'''''. You need id and apssword. Otherwise, use '''''http://chianti.ucsd.edu/svn'''''. You can checkout the project from this URL, but cannot checkin. | 1. If you are a core developer, use '''''svn+ssh://grenache.ucsd.edu/cellar/common/svn'''''. You need id and pssword. Otherwise, use '''''http://chianti.ucsd.edu/svn'''''. You can checkout the project from this URL, but cannot checkin. |
| Line 105: | Line 105: |
|
1. Select Source Code Management (SCM) system type to '''''svn''''' and make sure the URL is set to '''''http://chianti.ucsd.edu/svn/cytoscape3/trunk''''' (for core developers, '''''svn+ssh://grenache.ucsd.edu/common/svn/cytoscape3/trunk'''''). 1. Click '''''Finish''''' |
1. Select Source Code Management (SCM) system type to '''''svn''''' and make sure the URL is set to '''''http://chianti.ucsd.edu/svn/cytoscape3/trunk''''' (for core developers, '''''svn+ssh://grenache.ucsd.edu/cellar/common/svn/cytoscape3/trunk'''''). 1. Make sure '''''Check out All projects''''' checkbox is unchecked. Then click '''''Finish''''' |
| Line 111: | Line 111: |
|
1. You will be asked to select maven projects you want to import. Select '''top-level pom''' and '''application''' ONLY. {{attachment:select_pom.png}} |
|
| Line 115: | Line 120: |
|
== Step 3. Build Project and Run Cytoscape 3 on Felix == First, let's build and run Cytoscape 3 from Eclipse. 1. Select '''''core''''' project on the workspace. Right click and select '''''Run As > Maven install'''''. This command builds and install Cytoscape 3 bundles to your local maven repository and it takes several minutes to complete (depends on your machine power). |
== Step 3. Build and Run Cytoscape 3 on OSGi Frameworks == {{attachment:cs3_nimbus1.png}} ~-(Cytoscape 3 running on Windows XP + Java 6 update 13 with Nimbus L&F)-~ First, let's build and run Cytoscape 3 from Eclipse workspace. 1. Select '''''core''''' project on the workspace. Right click and select '''''Run As > Maven install'''''. When you select this command, Eclipse builds and installs Cytoscape 3 bundles to your local maven repository ('''''$HOME/.m2'''''). It takes several minutes to complete (depends on your machine power). |
| Line 122: | Line 132: |
|
* If you cannot complete this process due to failing tests, try the following: 1. Select '''''Run > Run Configurations''''' 1. Right-click Maven Build and create new setting 1. Set '''''core''''' as the base directory 1. Set '''''install''''' for ''goal'' and check '''''Skip Tests''''' 1. '''''Apply''''' and '''''Run''''' {{attachment:maven_install2.png}} This is a workaround for failing tests in Windows environment. We are working on this issue and once it is solved, you can call ''install'' goal from right-click menu. |
1. You will see the message in the console if it is successful. {{attachment:maven_install_success.png}} |
| Line 136: | Line 139: |
| 1. Set the goal to '''''pax:provision''''' | 1. Set the goal to '''''pax:run''''' |
| Line 146: | Line 149: |
|
=== Add OSGi Project Nature === At this point, each project in your workspace is defined as '''''Maven Project''''' and Eclipse can handle maven-specific features including dependency management and maven style source code directory structure. You can also add one more project nature to view/edit OSGi metadata file '''''MANIFEST.MF''''' by adding OSGi project nature. |
==== For Windows Users ==== {{{ [FelixStartLevel] DEBUG org.springframework.osgi.extender.internal.activator.ContextLoaderListener - Setting globally defined wait-for-dependencies timeout value=300000 ms, for bundle [org.cytoscape.work-swing-impl (org.cytoscape.work-swing-impl)] [FelixDispatchQueue] DEBUG cytoscape.application - BundleEvent RESOLVED [FelixDispatchQueue] DEBUG org.cytoscape.presentation-api - BundleEvent RESOLVED [FelixDispatchQueue] DEBUG org.cytoscape.splash - BundleEvent RESOLVED [FelixDispatchQueue] DEBUG org.swinglabs.swing-layout - BundleEvent RESOLVED [FelixDispatchQueue] DEBUG org.cytoscape.cy-commons-cli - BundleEvent RESOLVED [FelixDispatchQueue] DEBUG org.cytoscape.viewmodel - BundleEvent RESOLVED [FelixDispatchQueue] DEBUG org.cytoscape.work-spring-hack - BundleEvent RESOLVED [FelixDispatchQueue] DEBUG org.cytoscape.io-api - BundleEvent RESOLVED [FelixDispatchQueue] DEBUG org.cytoscape.work-swing-impl - BundleEvent STARTED [FelixDispatchQueue] DEBUG org.cytoscape.view.vizmap - BundleEvent RESOLVED [FelixDispatchQueue] DEBUG org.cytoscape.session-api - BundleEvent RESOLVED }}} Somehow, you need to press enter several times after the message above if you use Windows. Otherwise, you cannot proceed. === Generate Manifest File for Eclipse PDE === At this point, '''''application''''' project is configured as Maven project. This means you can use m2eclipse plugin's features for the project, such as POM file editor, dependency graph visualization, etc. Since Cytoscape 3 is an OSGi application, actual distribution file (jar file) always include a manifest file '''''MANIFEST.MF,''''' which is a meta data for the OSGi bundle. As you know, all Eclipse plugins are also OSGi bundles, you can use PDE's Manifest editor features for Cytoscape projects. You can configure Cytoscape 3 application project as an PDE project by following the procedure below: |
| Line 151: | Line 171: |
|
1. Name it ''Add OSGi Project Nature'' 1. Click '''''Browse Workspace''''' and select project you want to add OSGi project nature. In this example, attribute browser project is selected. 1. Set '''''pax:eclipse''''' for ''goals'' 1. '''''Apply''''' and '''''Run'''''. This process may take 1-5 minutes depends on your network connection because it downloads source code of the dependent libraries from public repository. |
1. Name it '''''Generate Manifest for Eclipse''''' 1. Click '''''Browse Workspace''''' and select '''''application''''' project. 1. Set '''''install pax:eclipse''''' for ''goals'' 1. '''''Apply''''' and '''''Run'''''. |
| Line 158: | Line 178: |
| 1. Once it is done, refresh the workspace (press F5). You can see '''''META-INF''''' directory and under the folder, you can find '''''MANIFEST.MF''''' file. This is the metadata |
1. Once it is done, refresh the workspace (press F5) and/or refresh maven project configuration by selecting '''''Maven ---> Update Maven Configuration'''''. You can see '''''META-INF''''' directory and under the folder, you can find '''''MANIFEST.MF''''' file. This is the metadata for OSGi bundle. 1. Right-Click '''application''' and select '''''PDE Tools ---> Open Manifest'''''. You can see the summary of the metadata. {{attachment:osgi_nature4.png}} |
| Line 166: | Line 190: |
|
==== Important Note: Maven and PDE ==== Eclipse PDE has a feature to build OSGi bundle manually. In this case, you need to edit MANIFEST.MF file by hand using PDE's Manifest editor. However, in Cytoscape project, we use [[http://felix.apache.org/site/apache-felix-maven-bundle-plugin-bnd.html|BND from Maven]] to generate MANIFEST-MF automatically. '''This means, even if you edit MANIFEST.MF file in your Eclipse project, it will not be used when you create bundle!''' Therefore, you can use PDE's manifest editor as viewer of current manifest file generated by maven plugin, but cannot use it as an editor. You can control the manifest file generation process by editing '''''pom.xml''''' and '''''osgi.bnd'''''. This will be discussed in plugin development documents. |
|
| Line 167: | Line 194: |
|
In this section, you will learn how to debug Cytoscape 3 on Eclipse. 1. First, let's set a sample break point in '''''!CytoscapeInit''''' class, which is the class to startup Cytoscape. It is in ''''' application/src/main/java/cytoscape/CytoscapeInit.java'''''. You can set breakpoint anywhere in the '''''public boolean init(CyInitParams params)''''' method. |
In this section, you learn how to debug Cytoscape 3 on Eclipse. 1. First, set a break point in '''''!CytoscapeDesktop''''' class, which is the class to startup Cytoscape Desktop GUI. It is in ''''' application/src/main/java/cytoscape/internam/view/CytoscapeDesktop.java'''''. You can set breakpoint anywhere in the code. |
| Line 172: | Line 199: |
|
{{attachment:pax0.png}} |
|
| Line 177: | Line 202: |
|
1. Name the configuration '''''Cytoscape 3''''' 1. Switch framework to '''''Felix 1.0.4''''' |
1. Name the configuration '''''Debug Cytoscape 3''''' 1. Switch framework to '''''Equinox 3.4.1''''' (or newer) |
| Line 183: | Line 208: |
|
1. Click '''''Arguments''''' tab 1. Add the following ''VM Arguments'' {{{ -Xbootclasspath/a:bundles/com.jgoodies.looks_2.1.2.jar:bundles/cytoscape-sun.jhall_1.0.0.jar }}} {{attachment:pax100.png}} |
|
| Line 192: | Line 209: |
| 1. Click '''''Add Pom'''''. Then select pom file under '''''runner''''' directory. To get the deploy-pom.xml file to show, you have to change the '''''File of type''''' ComboBox to have '''''Any File'''''. |
1. Click '''''Add Pom'''''. Select top-level pom file ans set start level to 1. 1. Select pom file under '''''runner''''' directory. To get the deploy-pom.xml file to be displayed, you have to change the '''''File of type''''' ComboBox to have '''''Any File'''''. 1. '''''Apply''''' and '''''Debug''''' |
| Line 196: | Line 215: |
|
1. '''''Apply''''' and '''''Debug''''' {{attachment:pax3.png}} |
|
| Line 204: | Line 219: |
| Line 205: | Line 221: |
|
{{attachment:pax5.png}} |
|
| Line 214: | Line 228: |
|
* If you want to use Equinox console, please read its documents. Commands are very similar. |
|
| Line 377: | Line 393: |
|
If you have troubles to install Cytoscape IDE, or you want to install newer versions of individual plugins, you can install them manually. |
|
| Line 382: | Line 400: |
| You can install the Subclipse plugin from '''''Help > Software Updates...''''' Click '''''Available Software''''' tab and add this URL by pressing '''''Add Site''''' button: http://subclipse.tigris.org/update_1.4.x | You can install the Subclipse plugin from '''''Help > Software Updates...''''' Click '''''Available Software''''' tab and add this URL by pressing '''''Add Site''''' button: http://subclipse.tigris.org/update_1.6.x |
| Line 395: | Line 413: |
|
===== Spring IDE ===== Cytoscape desktop application is wired by Spring. Eclipse has a plugin called '''Spring IDE''' which helps you to edit XML files to configure the application. You can install it from: http://dist.springframework.org/release/IDE |
Checkout, Compile, and Test Cytoscape 3 Core on Eclipse
Status
Current version is not compatible with Eclipse 3.5 (Galileo). I'll release updated version soon: KeiichiroOno (10/2/2009)
 Document revesion 1.5: Updated for Cytoscape IDE 0.1.1. All steps are confirmed to work on Windows XP SP3 + JDK 1.6.0u13: KeiichiroOno (5/8/2009)
 Document revesion 1.5.1: Minor update: KeiichiroOno (5/18/2009)
Contents
Introduction
This tutorial is for Java developers who wants to learn how to checkout code, compile, and test Cytoscape 3 with Eclipse PDE and other Eclipse plugins.
Tutorial
Step 1. Setup Your Environment
To develop Cytoscape 3 on Eclipse, you need to install several software packages.
1. Java Development Kit (JDK)
You need to install JDK version 5 or 6. Should work on both 32 bit and 64 bit versions. I tested this tutorial with the following JDK:
java version "1.6.0_13"
Java(TM) SE Runtime Environment (build 1.6.0_13-b03)
Java HotSpot(TM) Client VM (build 11.3-b02, mixed mode)
I strongly recommend to use Java 6 if it is available for your platform.
2. Eclipse PDE
This tutorial is based on the latest version of Eclipse 3.4, called Ganymede. Several distributions are available on Eclipse web site. In this tutorial, we use Eclipse for RCP/Plug-in Developers version 3.4. This distribution includes PDE (Plugin development environment). I recommend to install latest version of Eclipse PDE to a new directory on your machine. Otherwise, the screenshots may be different due to Eclipse plugins you have already installed on your machine.
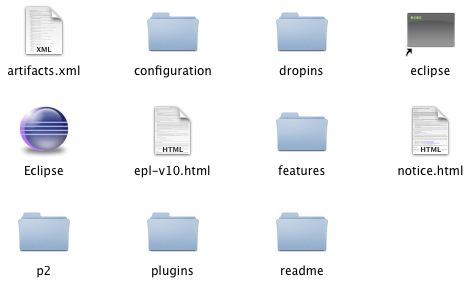
You can install Eclipse by just extracting archive file (zip/gzip) to a directoly of your choice. By default, the eclipse directory should look like the following:
To keep your Eclipse up-to-date, you can update plugins by software updater (help-->software updates...)
For Windows Users: Set JDK JVM
Usually, Eclipse for Windows use JRE virtual machine instead of JDK's VM. To use JDK's VM, create a shortcut and edit the shortcut's property:
eclipse.exe -vm "c:¥path to jdk¥bin¥javaw.exe"
3. Cytoscape IDE
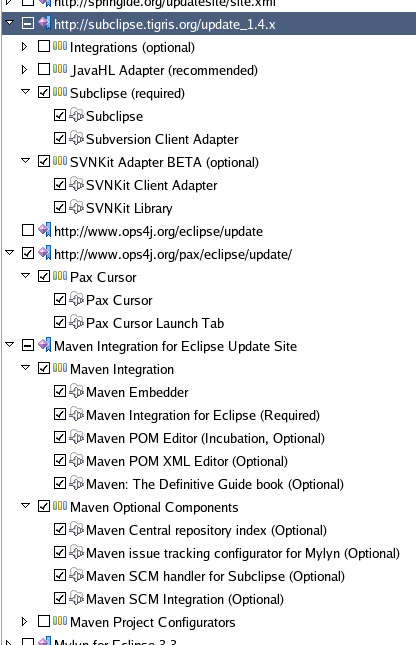
You can install all required Elcipse plugins for Cytoscape 3 development at once by installing Cytoscape IDE Plugin for Eclipse.
Select Help-->Software Updates...
Select Available Software tab
Click Add Site button and type http://chianti.ucsd.edu/kono/cyide in the Location text box. Then press OK.
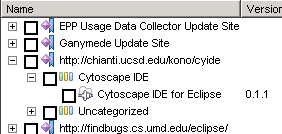
Eclipse automatically scans the location and displays available plugins. You have to choose only one plugin, Cytoscape IDE for Eclipse
Press Install button and follow instructions. This process takes several minutes because it installes lots of plugins at once. When installation is complete, you will be asked to restart Eclipse. Press Yes and restart Eclipse.
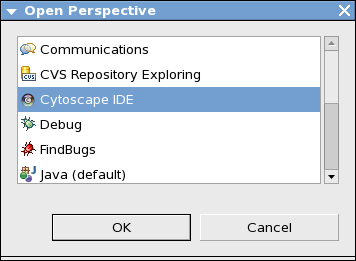
Select Window-->Open Perspective-->Other. Then you can find Cytoscape IDE as a new perspective. Select it and press OK
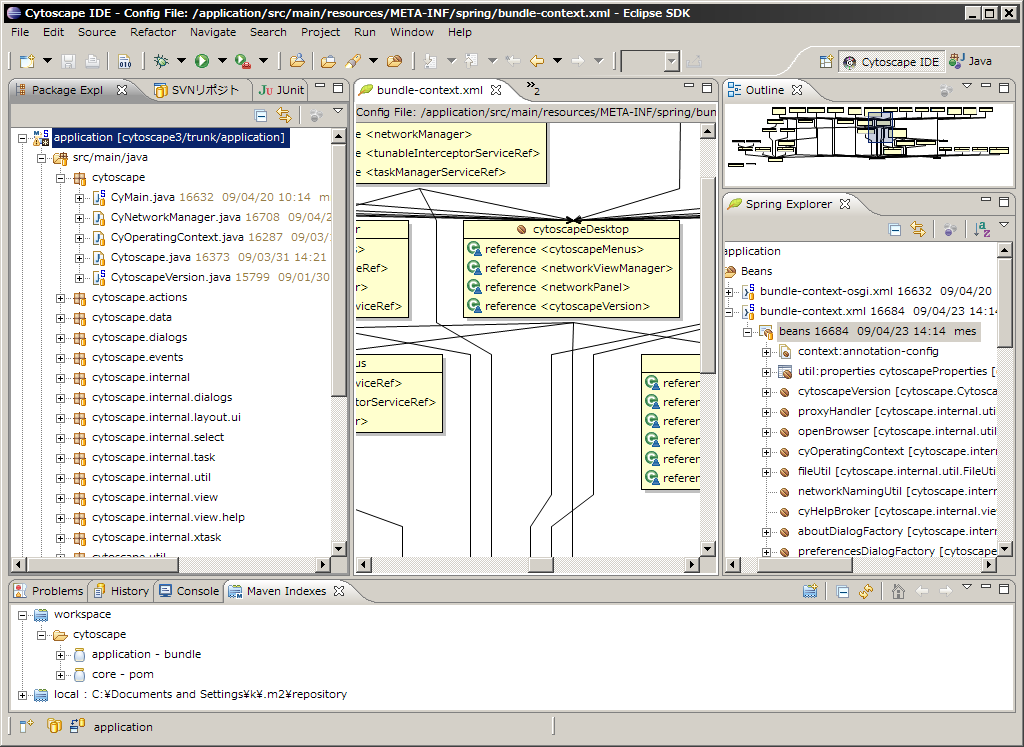
- If your workspace layout looks like the following, Eclipse is ready to develop Cytoscape 3.
Note: My Testing Environment
I've tested the following tutorial on these platforms:
- Common
- Eclipse PDE 3.4.2 Ganymede
Test Platform 1 (Unix) Confirmed to work
- RHEL 5 Desktop 64 bit
- Java SE 6 update 13 64 bit
Test Platform 2 (Windows) Still have small issues
- Windows XP SP3 32 Bit
JDK SE 6 update 13 Important Note: You should use JDK, not JRE.
- Test Platform 3 (Mac)
Step 2. Checkout and Create Cytoscape 3 Eclipse Project
In this section, you will learn how to create an Eclipse project from the fresh Cytoscape 3 checkout.
Checkout Cytoscape 3 Trunk
- Start Eclipse. I recommend to use an empty, new workspace only for Cytoscape 3 project since it creates tons of new bundle projects in your workspace. Make sure Cytoscape IDE perspective is selected.
 Turn off automatic build. (uncheck Project > Build Automatically)
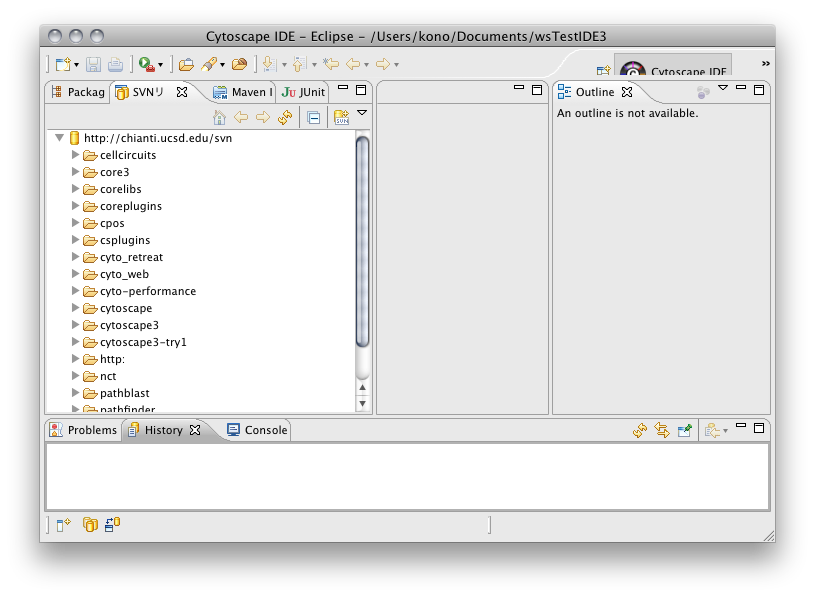
 Select SVN Repository tab. Cytoscape subversion repository will appear automatically.
If you are a core developer, use svn+ssh://grenache.ucsd.edu/cellar/common/svn. You need id and pssword. Otherwise, use http://chianti.ucsd.edu/svn. You can checkout the project from this URL, but cannot checkin.
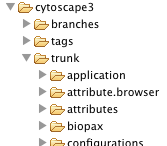
The Cytoscape 3 repository is cytoscape3/trunk.
From SVN Repository window, right-click cytoscape3 > trunk and select Check out as Maven project...
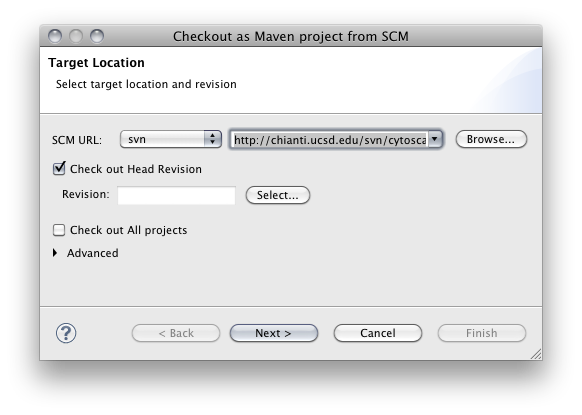
Select Source Code Management (SCM) system type to svn and make sure the URL is set to http://chianti.ucsd.edu/svn/cytoscape3/trunk (for core developers, svn+ssh://grenache.ucsd.edu/cellar/common/svn/cytoscape3/trunk).
Make sure Check out All projects checkbox is unchecked. Then click Finish
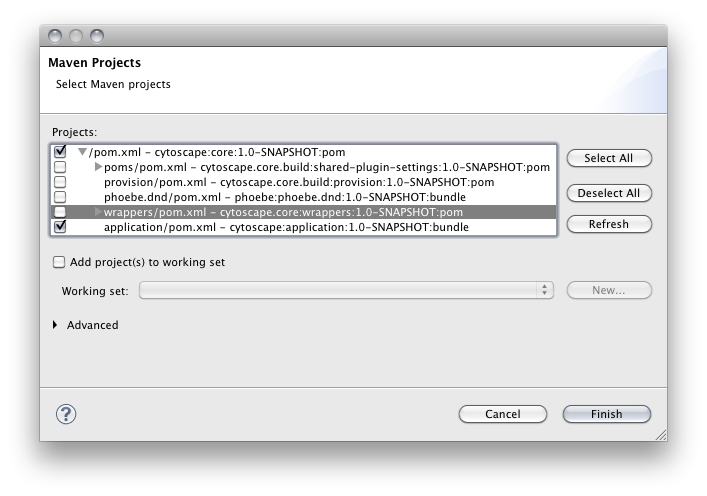
You will be asked to select maven projects you want to import. Select top-level pom and application ONLY.
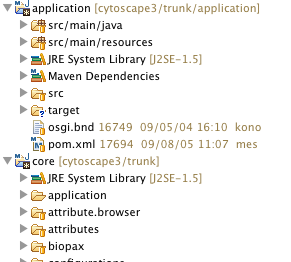
Select Package Explorer tab. Your Eclipse workspace looks like the following:
Step 3. Build and Run Cytoscape 3 on OSGi Frameworks
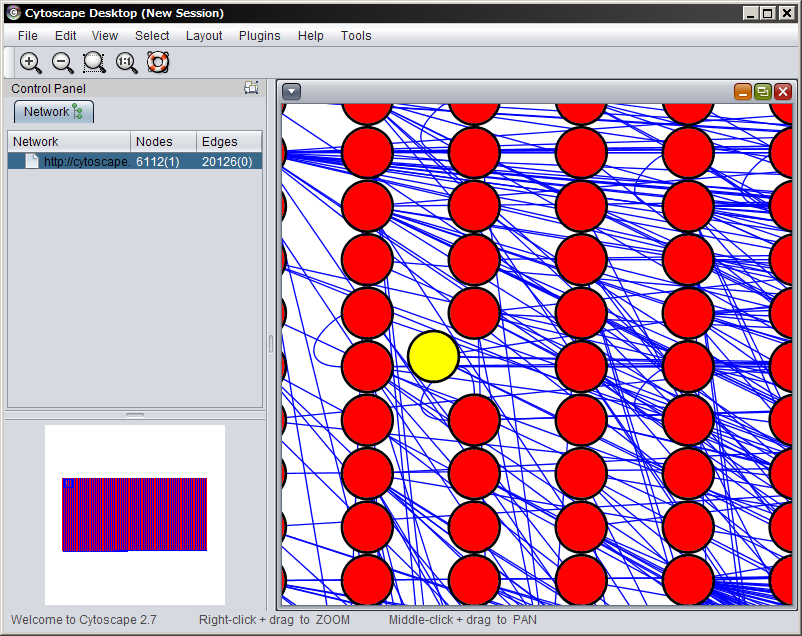
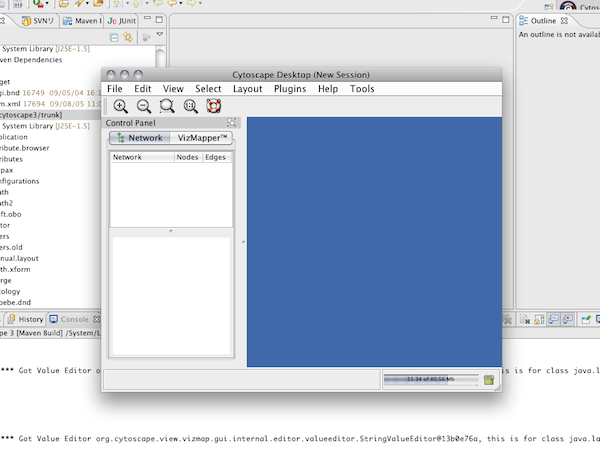
(Cytoscape 3 running on Windows XP + Java 6 update 13 with Nimbus L&F)
First, let's build and run Cytoscape 3 from Eclipse workspace.
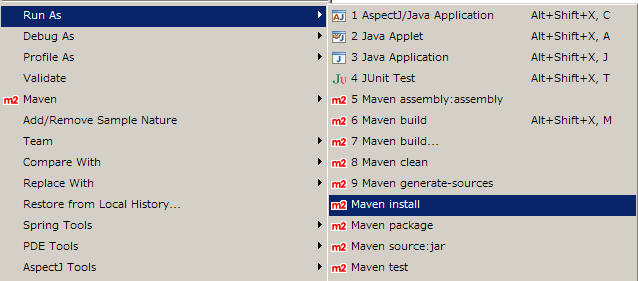
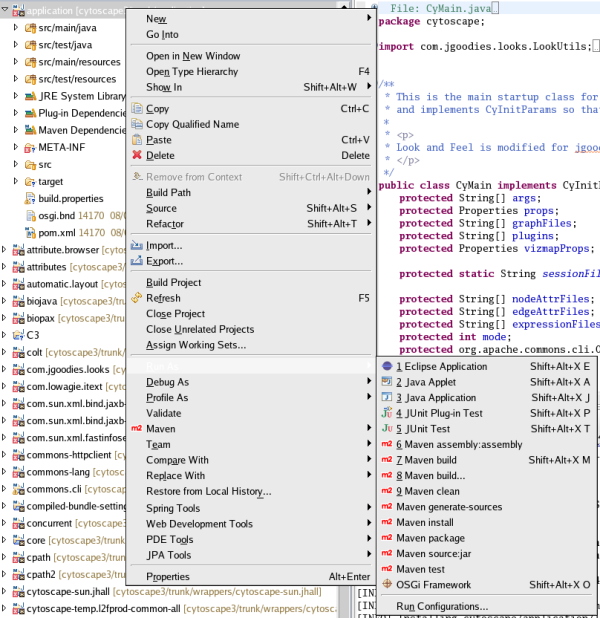
Select core project on the workspace. Right click and select Run As > Maven install. When you select this command, Eclipse builds and installs Cytoscape 3 bundles to your local maven repository ($HOME/.m2). It takes several minutes to complete (depends on your machine power).
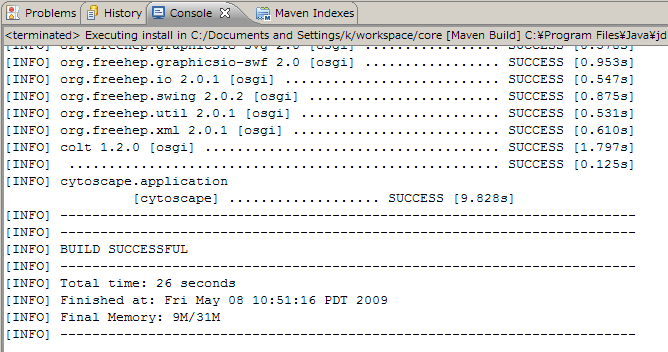
- You will see the message in the console if it is successful.
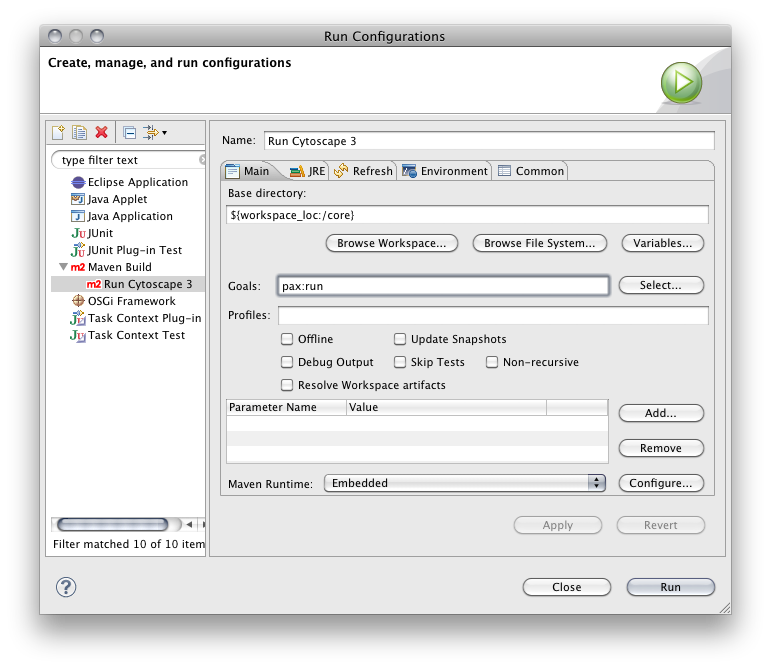
Select Run → Run Configurations
Create new Maven Build and name it
Set the Base directory to core bundle
Set the goal to pax:run
- Apply and Run. You can use Felix Shell commands on the console.
- Quit Cytoscape
For Windows Users
[FelixStartLevel] DEBUG org.springframework.osgi.extender.internal.activator.ContextLoaderListener - Setting globally defined wait-for-dependencies timeout value=300000 ms, for bundle [org.cytoscape.work-swing-impl (org.cytoscape.work-swing-impl)]
[FelixDispatchQueue] DEBUG cytoscape.application - BundleEvent RESOLVED
[FelixDispatchQueue] DEBUG org.cytoscape.presentation-api - BundleEvent RESOLVED
[FelixDispatchQueue] DEBUG org.cytoscape.splash - BundleEvent RESOLVED
[FelixDispatchQueue] DEBUG org.swinglabs.swing-layout - BundleEvent RESOLVED
[FelixDispatchQueue] DEBUG org.cytoscape.cy-commons-cli - BundleEvent RESOLVED
[FelixDispatchQueue] DEBUG org.cytoscape.viewmodel - BundleEvent RESOLVED
[FelixDispatchQueue] DEBUG org.cytoscape.work-spring-hack - BundleEvent RESOLVED
[FelixDispatchQueue] DEBUG org.cytoscape.io-api - BundleEvent RESOLVED
[FelixDispatchQueue] DEBUG org.cytoscape.work-swing-impl - BundleEvent STARTED
[FelixDispatchQueue] DEBUG org.cytoscape.view.vizmap - BundleEvent RESOLVED
[FelixDispatchQueue] DEBUG org.cytoscape.session-api - BundleEvent RESOLVED
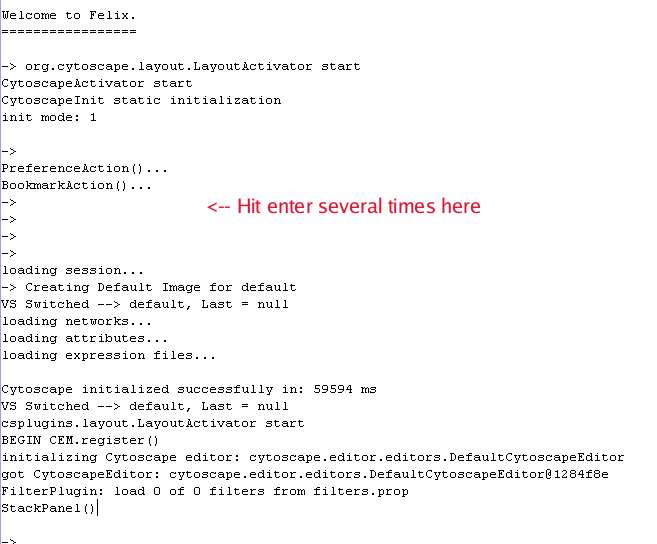
Somehow, you need to press enter several times after the message above if you use Windows. Otherwise, you cannot proceed.
Generate Manifest File for Eclipse PDE
At this point, application project is configured as Maven project. This means you can use m2eclipse plugin's features for the project, such as POM file editor, dependency graph visualization, etc. Since Cytoscape 3 is an OSGi application, actual distribution file (jar file) always include a manifest file MANIFEST.MF, which is a meta data for the OSGi bundle. As you know, all Eclipse plugins are also OSGi bundles, you can use PDE's Manifest editor features for Cytoscape projects. You can configure Cytoscape 3 application project as an PDE project by following the procedure below:
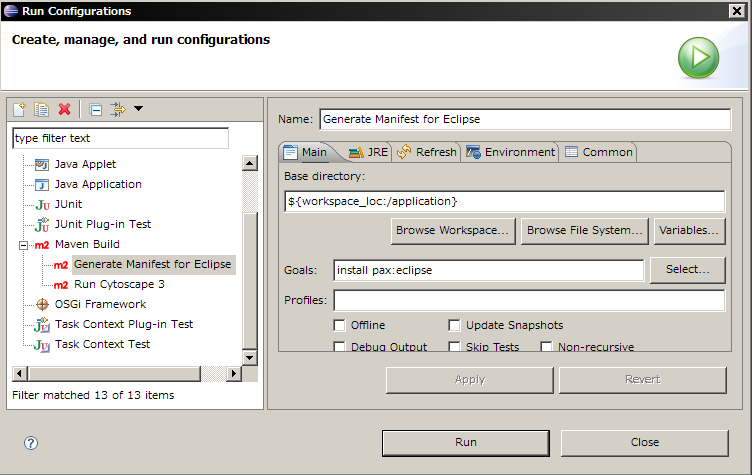
Select Run > Run Configurations...
Create new Maven Build
Name it Generate Manifest for Eclipse
Click Browse Workspace and select application project.
Set install pax:eclipse for goals
Apply and Run.
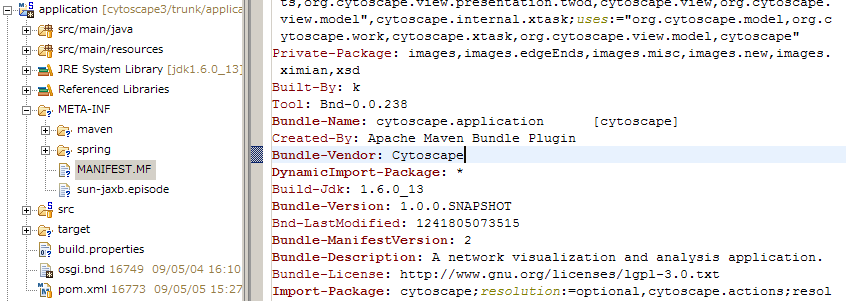
Once it is done, refresh the workspace (press F5) and/or refresh maven project configuration by selecting Maven ---> Update Maven Configuration. You can see META-INF directory and under the folder, you can find MANIFEST.MF file. This is the metadata for OSGi bundle.
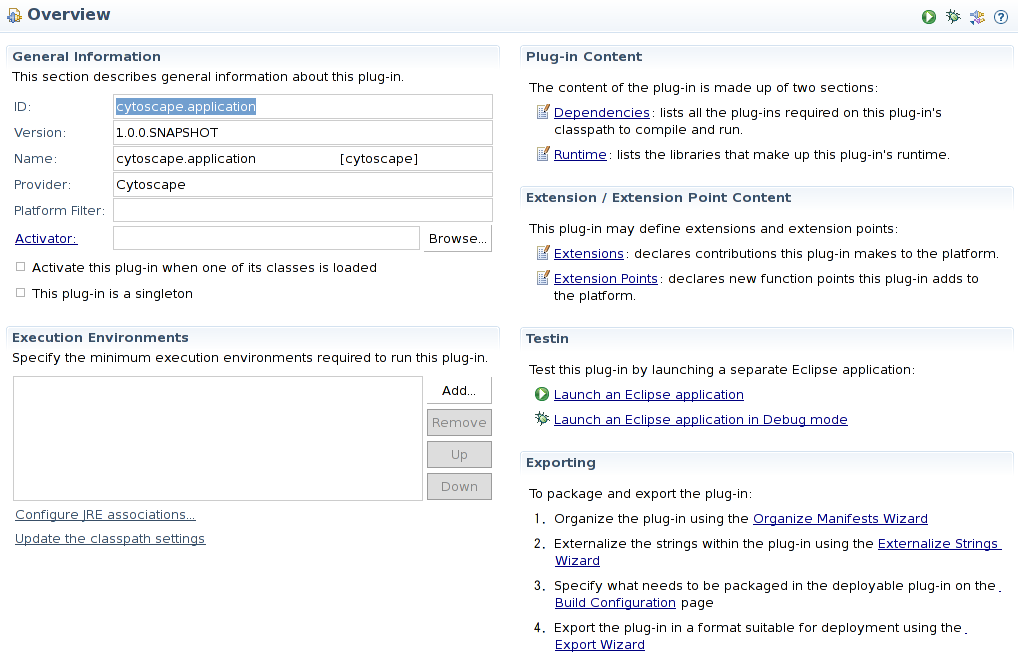
Right-Click application and select PDE Tools ---> Open Manifest. You can see the summary of the metadata.
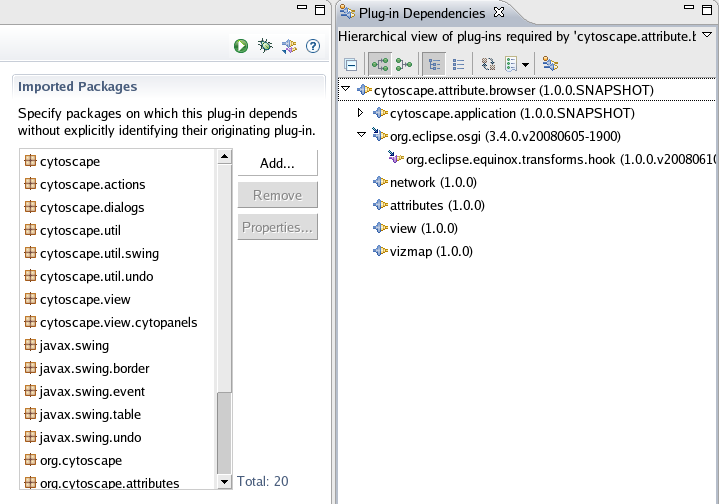
Editing this metadata file by writing BND statements is beyond the scope of this tutorial and will be discussed later in Plugin Development section. However by using this feature, you can see what packages are available for the selected project (bundle), and what packages will be exported as public API.
Important Note: Maven and PDE
Eclipse PDE has a feature to build OSGi bundle manually. In this case, you need to edit MANIFEST.MF file by hand using PDE's Manifest editor. However, in Cytoscape project, we use BND from Maven to generate MANIFEST-MF automatically. This means, even if you edit MANIFEST.MF file in your Eclipse project, it will not be used when you create bundle! Therefore, you can use PDE's manifest editor as viewer of current manifest file generated by maven plugin, but cannot use it as an editor. You can control the manifest file generation process by editing pom.xml and osgi.bnd. This will be discussed in plugin development documents.
Step 4. Debug Cytoscape 3 on Eclipse with PAX Cursor
In this section, you learn how to debug Cytoscape 3 on Eclipse.
First, set a break point in CytoscapeDesktop class, which is the class to startup Cytoscape Desktop GUI. It is in application/src/main/java/cytoscape/internam/view/CytoscapeDesktop.java. You can set breakpoint anywhere in the code.
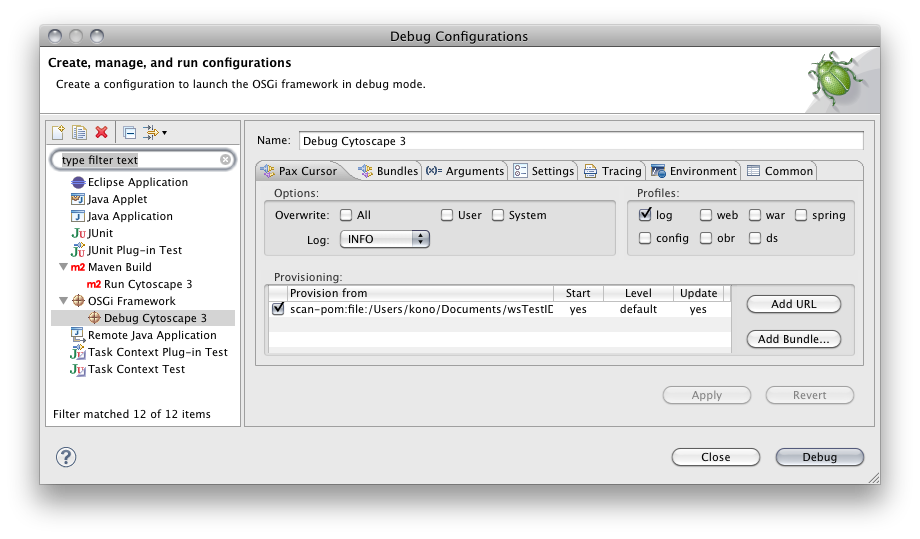
From Eclipse main window, select Run → Debug Configurations
Right click on OSGi Framework and select New
Name the configuration Debug Cytoscape 3
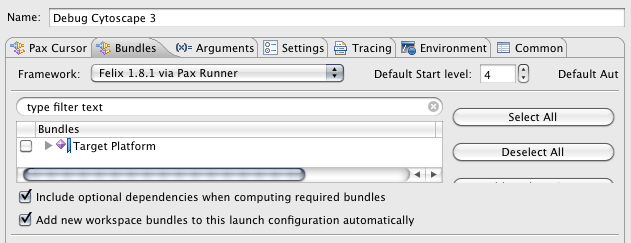
Switch framework to Equinox 3.4.1 (or newer)
None of the files should be selected in the bundle list
Click the Pax Cursor tab
Click Add Pom. Select top-level pom file ans set start level to 1.
Select pom file under runner directory. To get the deploy-pom.xml file to be displayed, you have to change the File of type ComboBox to have Any File.
Apply and Debug
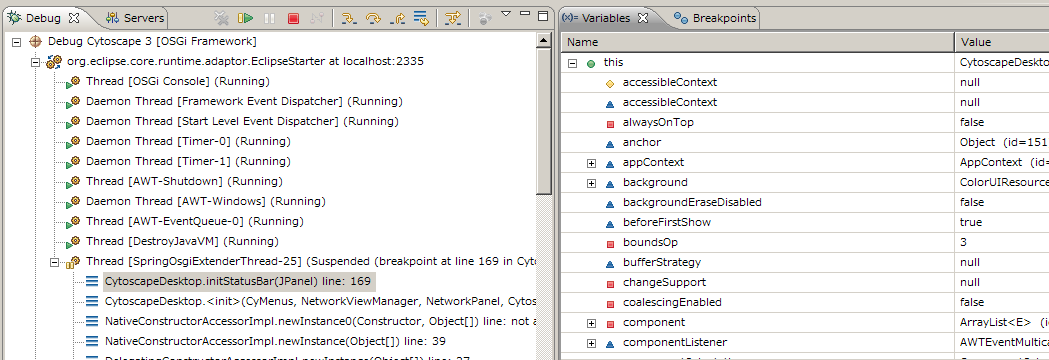
- Now you can see Cytoscape running on Felix and debugger shows current status of variables
Just like other applications, Eclipse debugger stops execution at the break-point you specified in the source code. To start again, you need to press green triangle (Resume button).
Basically, the debugging process is same as regular Java projects. Once you edit something in the source code, you can rebuild and deploy it to local repository by Maven install command. Then you can repeat the procedure above to check internal states of Cytoscape 3 by Eclipse debugger.
Working with Felix OSGi Console
Cytoscape 3 is an OSGi application and you can check the status of bundles from OSGi console. After you start Cytoscape 3 from Eclipse, you can see a prompt on the Console window (if not, hit enter in the console to show the prompt). The following is some useful command to check internal states of the OSGi system. For more information, please visit [Felix web site].
- If you want to use Equinox console, please read its documents. Commands are very similar.
help - display help message
-> help
bundlelevel <level> <id> ... | <id> - set or get bundle start level.
cd [<base-URL>]                     - change or display base URL.
headers [<id> ...]                  - display bundle header properties.
help                                - display impl commands.
install <URL> [<URL> ...]           - install bundle(s).
packages [<id> ...]                 - list exported packages.
ps [-l | -s | -u]                   - list installed bundles.
refresh [<id> ...]                  - refresh packages.
resolve [<id> ...]                  - attempt to resolve the specified bundles.
services [-u] [-a] [<id> ...]       - list registered or used services.
shutdown                            - shutdown framework.
start <id> [<id> <URL> ...]         - start bundle(s).
startlevel [<level>]                - get or set framework start level.
stop <id> [<id> ...]                - stop bundle(s).
uninstall <id> [<id> ...]           - uninstall bundle(s).
update <id> [<URL>]                 - update bundle.
version                             - display version of framework.
ps - List loaded bundles
-> ps
START LEVEL 4
   ID   State         Level  Name
[   0] [Starting   ] [    0] System Bundle (1.0.4)
[   1] [Active     ] [    4] cytoscape.util.intr [cytoscape] (1.0.0.SNAPSHOT)
[   2] [Active     ] [    4] cytoscape.graph.fixed [cytoscape] (1.0.0.SNAPSHOT)
[   3] [Active     ] [    4] cytoscape.graph.dynamic [cytoscape] (1.0.0.SNAPSHOT)
[   4] [Active     ] [    4] org.cytoscape.network [org.cytoscape] (1.0.0.SNAPSHOT)
[   5] [Active     ] [    4] cytoscape.render.immed [cytoscape] (1.0.0.SNAPSHOT)
[   6] [Active     ] [    4] cytoscape.geom.spacial [cytoscape] (1.0.0.SNAPSHOT)
[   7] [Active     ] [    4] cytoscape.render.stateful [cytoscape] (1.0.0.SNAPSHOT)
[   8] [Active     ] [    4] cytoscape.geom.rtree [cytoscape] (1.0.0.SNAPSHOT)
[   9] [Active     ] [    4] cytoscape.render.export [cytoscape] (1.0.0.SNAPSHOT)
[  10] [Active     ] [    4] org.cytoscape.attributes (1.0.0.SNAPSHOT)
[  11] [Active     ] [    4] org.cytoscape.tunable (1.0.0.SNAPSHOT)
[  12] [Active     ] [    4] cytoscape.task [cytoscape] (1.0.0.SNAPSHOT)
[  13] [Active     ] [    4] phoebe.dnd [phoebe] (1.0.0.SNAPSHOT)
[  14] [Active     ] [    4] undo (1.0.0.SNAPSHOT)
[  15] [Active     ] [    4] org.cytoscape.view (1.0.0.SNAPSHOT)
[  16] [Active     ] [    4] org.apache.commons.cli             [org.apache] (1.0.0.SNAPSHOT)
[  17] [Active     ] [    4] Apache Commons Lang (2.4.0)
[  18] [Active     ] [    4] org.cytoscape.layout (1.0.0.SNAPSHOT)
[  19] [Active     ] [    4] org.cytoscape.vizmap (1.0.0.SNAPSHOT)
[  20] [Starting   ] [    4] cytoscape.application              [cytoscape] (1.0.0.SNAPSHOT)
[  21] [Resolved   ] [    4] JDOM DOM Processor (1.0.0)
[  22] [Resolved   ] [    4] Java Activation API (1.1.0)
[  23] [Installed  ] [    4] Concurrent (1.3.4)
[  24] [Resolved   ] [    4] Lowagie iText (2.0.8)
[  25] [Installed  ] [    4] csplugins.automatic.layout [csplugins] (1.0.0.SNAPSHOT)
 .
 .
 .
services - show list of available OSGi Services
services BUNDLE_ID - show detail of services abailable from the bundle
-> services 25

csplugins.automatic.layout [csplugins] (25) provides:
-----------------------------------------------------
name = force-directed
objectClass = org.cytoscape.layout.CyLayoutAlgorithm
preferredMenu = Cytoscape Layouts
service.id = 21
----
name = circular
objectClass = org.cytoscape.layout.CyLayoutAlgorithm
preferredMenu = Cytoscape Layouts
service.id = 22
----
name = hierarchical
objectClass = org.cytoscape.layout.CyLayoutAlgorithm
preferredMenu = Cytoscape Layouts
service.id = 23
----
.
.
.
services -u - show usage of services.
-> services -u

System Bundle (0) uses:
-----------------------
org.osgi.service.startlevel.StartLevel

org.cytoscape.layout (18) uses:
-------------------------------
org.cytoscape.layout.CyLayoutAlgorithm
org.cytoscape.layout.CyLayoutAlgorithm
org.cytoscape.layout.CyLayoutAlgorithm
org.cytoscape.layout.CyLayoutAlgorithm
org.cytoscape.layout.CyLayoutAlgorithm
services -u BUNDLE_ID - show more detail about service usage of the bundle
org.cytoscape.layout (18) uses:
-------------------------------
name = force-directed
objectClass = org.cytoscape.layout.CyLayoutAlgorithm
preferredMenu = Cytoscape Layouts
service.id = 21
----
name = circular
objectClass = org.cytoscape.layout.CyLayoutAlgorithm
preferredMenu = Cytoscape Layouts
service.id = 22
----
name = hierarchical
objectClass = org.cytoscape.layout.CyLayoutAlgorithm
preferredMenu = Cytoscape Layouts
service.id = 23
----
.
.
.
Note: The behaviour of Cytoscpae 3 running on Felix will be different from time to time. This is because budle loading timing is not properly controlled now. This will be solved by organizing bundle/service dependency. I'm working on this issue now and hopefully it will be solved soon.
Notes
Now you are ready to hack Cytoscape 3 on Eclipse. As you can see on your workspace, Cytoscape 3 is a collection of OSGi bundles. Each bundle is built as a Maven project and has a pom.xml file.
Currently, the desktop version of Cytoscape 3 is called application bundle. Under src/main/java you can see the source tree. You can edit these source files just like 2.x series, and create the bundle by running maven commands. To run them, you need to select (right click) the project name and then select maven command from Run As menu:
- maven clean - clean all classes from target directory.
- maven install - build everything under the selected project, create bundles, run tests, and install them to your local Maven repository
To run your modified code, you just need to do maven install and run debugger.
Troubleshooting
Somehow Cytoscape 3 Eclipse project is broken and I cannot compile it anymore
From terminal, run mvn pax:clean pax:eclipse. This cleans up everything and gives you a fresh workspace.
pax:provision fails. What should I do?
Cleaning up the working space (maven clean) and rebuilding it (maven install) solves this problem in most cases.
Cannot compile application bundle. Eclipse display some warning messages and cannot complete install goal
Comment out following lines in pom.xml in core directory:
<showWarnings>true</showWarnings>
<showDeprecation>true</showDeprecation>
Eclipse and Cytoscape are frozen after splashscreen is displayed. What happened?
- On Windows, somehow Felix shell waits user's key entry after Cytoscape displays splashscreen. To proceed, you need to hit enter key in the console window (see below):
- On Windows, somehow Felix shell waits user's key entry after Cytoscape displays splashscreen. To proceed, you need to hit enter key in the console window (see below):
Appendix
Install Required Eclipse Plugins One by One
If you have troubles to install Cytoscape IDE, or you want to install newer versions of individual plugins, you can install them manually.
Subversion Client (Subclipse)
Cytoscape 3 source code is managed by Subversion. To access the repository, you need to install subversion client for Eclipse. In this tutorial, I'll use Subclipse. You can install the plugin from the eclipse's update manager. Do not forget to install SVNKit. Otherwise, you will get an error message when you try to check out repository ("Unable to load default SVN Client")
You can install the Subclipse plugin from Help > Software Updates... Click Available Software tab and add this URL by pressing Add Site button: http://subclipse.tigris.org/update_1.6.x
PAX Cursor
PAX Cursor is an Eclipse plugin developed by OPS4J developers. Basically, it is an Eclipse integration for PAX-Runner. By this plugin, you can run set of bundles on multiple platforms including Felix, Equinox, and Knopflerfish.
To install this Eclipse plugin, just follow the standard plugin installation procedure discussed above.
PAX Cursor Eclipse Update Site - http://www.ops4j.org/pax/eclipse/update/
Maven Integration for Eclipse (m2eclipse)
Cytoscape build system has been moved to Maven. To use maven from Eclipse, you need to follow this instruction. Even if you run all maven commands from Eclipse, you still need to install command-line version of Maven since Eclipse embedded version of maven have issues to execute some maven goals.
m2eclipse plugin update site - http://m2eclipse.sonatype.org/update/
Spring IDE
Cytoscape desktop application is wired by Spring. Eclipse has a plugin called Spring IDE which helps you to edit XML files to configure the application. You can install it from:
http://dist.springframework.org/release/IDE
This document is written by KeiichiroOno
If you have any questions, please e-mail me (kono at ucsd dot edu. English or Japanese)

